There are some changes this week because of the craft show this weekend. I just printed labels for some of products and need to finish up some products for the show. I have had no time to make a card for Thursday. So I will not promise a post. You will need to check on Thursday afternoon as I normally post in the morning. Also, I will be setting up on Friday and there will be no project this week—plans to resume it the following Friday. I hope to get projects to my assistant next week.
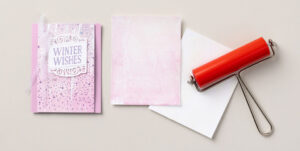
This time we are looking at new tool called the Brayer. Stampin’ Up! had one a long time ago and now it is back!

Need a new technique or tool to feature during your next class or gathering? Why not try the Stampin’ Brayer? With its metal handle and plastic roller base (which looks like a tiny, red rolling pin!) it’s just the thing for rolling ink onto your paper. The amount of coverage is up to you!
Yessica, the Concept Artist who created this sparkly, vintage-looking card, loves that the brayer can be used on different surfaces and over a variety of finishes and textures. For this card, she used it to apply ink over a thin layer of Shimmery White Embossing Paste (which she allowed to dry before applying Bubble Bath, Fresh Freesia, and Highland Heather Classic Stampin’ ink). “I love the irregular streaks!” she said.
“I used the Falling Snow Background Stamp to add yet another layer,” she continued, “making this the perfect base for a simple yet striking sentiment.” If you’re wondering about that gorgeous tag, it was made using the retro Christmas Labels Bundle. Iridescent Faceted Gems plus Iridescent 1/2″ (1.3 cm) Striped Trim finish this stunning card.
I’m looking forward to using the brayer to lay color over raised embossed images, Glimmer Specialty Paper, and much more!”
Just a reminder the Clearance rack has been updated. Just Click Here


