
Come with me and take a journey into the wonderful world of stamping. These videos are here to help you understand stamping and enjoy your hobby.
Stampin 101 Basics
The basic supplies to get started:
- Trimmer and scoring board
- Bone Folder
- Adhesive (see explanation below)
- Card stock and Designer Series paper
- Clear Blocks
- Stamps
- Cleaner for your stamps
- Piercing Mat
Here are some quick guidelines to help you choose an adhesive for your project.
Snail Adhesive – this type of adhesive is excellent for adhering papers of all sorts together. It’s the go-to adhesive for card makers and scrapbookers and it s very cost effective. You only need a bit in each corner and in the middle for a photo sized panel for good hold. Some popular versions of this type are SNAIL (from Stampin’ Up!), ATG from Scotch and 3L.
Dimensional Adhesive – made from thin foam with adhesive on both sides, these tiny pieces will allow your projects to have some dimension as the items you adhere will be lifted slightly off the page. Pop Dots, Stampin’ Dimensionals (from Stampin’ Up!) and foam tape from 3M are popular with all kinds of paper crafters.
Adhesive Dots – these are little dots of super sticky adhesive on sheets or rolls of release paper. These are most often used to adhere 3-D elements like buttons, metal embellishments and bows, for example. They can be used to adhere pieces of paper together but, depending the thickness of the dot, can leave bumps. The most popular version of this product is called Glue Dots and can be found in almost all craft stores and catalogs.
Adhesive Tape – This is different from a Snail Tape as it is just tape on a roll and is much stronger than the adhesive in a Tape Runner. It’s perfect for creating boxes, bags and other 3-D projects from papers. Two popular versions are “Red Line” tape – so called because of the red tape liner – and tearable tape such asTear and Tape (from Stampin’ Up!). Red Line tape products require cutting with a sharp pair of scissors where tearable tape is just that; tearable
Liquid Adhesive – Good for adhering 3-D embellishments, this liquid can also be used to apply areas of glitter. Not the best choice for paper items since it can cause buckling. A little goes a LONG way!
Liquid Glue: This is like Tombow which is effective on paper and card stock. A little goes a long way.
Stampin 101 Inks:
What is the difference in the inks?
Stampin 101 Stamps and Care:
Understanding the difference in stamps and the care of them
Stampin 101 Paper:
Quality is key.
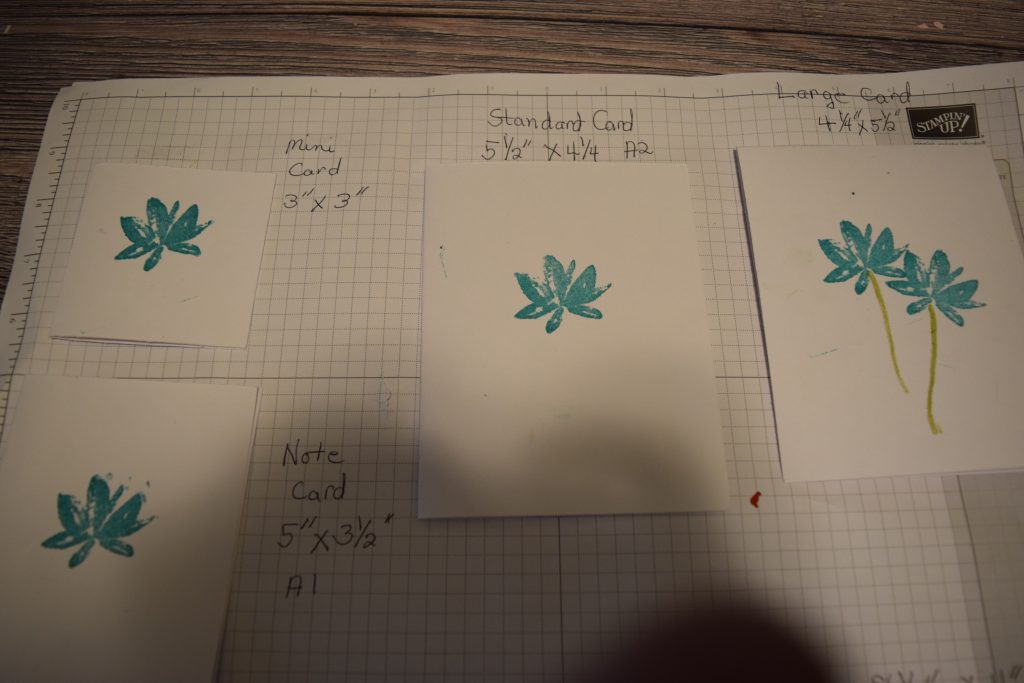
Different Sizes of Cards
Stampin 101 Punches:
Adding so much with ease to your projects. Using a diverse array of punches makes stampin quick and easy for your projects shine.
Stampin 101:
Big Shot will be your best friend.
Stampin 101:
Embossing folder will add interest to your project with texture.
Stampin 101 Thinlits and Framelits:
What is the differences between Thinlits and Framelits?
Stampin 101 Embellishments and More:
Doing more to make your project stand out. By adding ribbon, baker’s twine, sparkle, and trinkets among other things adds interest to any project.
Now that you have learned the steps to making your projects, it is time to put it to work. I know what your thoughts are….. I have the tools, but don’t know where to begin. As you sit and stare at the paper and then the internet, you realize time has passed and you have nothing show for it. This is where my blog post will help and you can search by category or go to Sketches under the Ideas and Tutorials. Also, you can search card sketches on the internet. Just remember when you start making your card to know what occasion is this card for and if you know who it is for will help. You don’t have to know who the card is for if you are wanting to build a supply up. For example, birthdays ask yourself Do I send adult or children cards, male or female? So pick a sketch and get started!
I hope these videos help you to enjoy your stamping. Don’t forget to checkout the technique tutorials in the Technique Section of videos. Also, on the blog post you will find a Color Lab (button) click on it. This is designed for you to see the different colors Stampin’ Up! has to offer and how they look together. So play with it. If you still have questions, please email me at pamela@stampinpinkrose.com. I will be happy to answer your questions if you include your email.


Pingback: The Goodbye Is Almost Here | Stampin' Pink Rose