Weekly Newsletter What Level Are You?

Now that the spring Catalog and Sale-a-bration items have been released. Do you have a favorite?  This weekend I spent some time playing with the Shaped Heart in the Sale-a-bration brochure.  This is so different because we have dies to go with it.

There is always a card style for a beginner or beyond.  Even we are more experienced like beginner cards because we can finish a card if we are short on time. so now pick which level you are comfortable with and play.

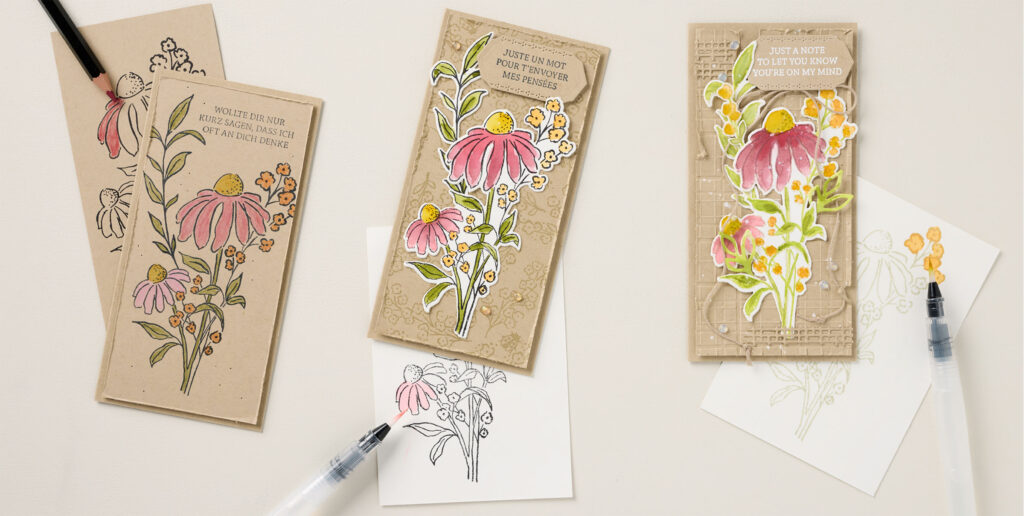
Winter or summer, rain or shine, floral cards are always in season—so they’re the perfect, “can’t miss” theme for your next event! Today we have three versions to show you—one beginner card plus two step-ups—so you’ll be ready with a project to suit anyone who might come to your gathering.

Start the beginner card by layering one Crumb Cake Cardstock piece over another, leaving a small “frame” around the top layer. Then, stamp the images on the top layer in Tuxedo Black Memento ink and color with Watercolor Pencils. (We used Cherry Cobbler, Crushed Curry, Flirty Flamingo, Old Olive, and Pumpkin Pie.) Finish the card by distressing the edges with scissors.

For the mid-level card, stamp the small floral images on the top Crumb Cake Cardstock layer in Crumb Cake ink to create a tone-on-tone background. Stamp the flowers and leaves on Fluid 100 Watercolor Paper using StāzOn, watercolor them using Classic Stampin’ Ink Refills and a Water Painter, then die cut. “Glow up” your card using a few embellishments from the Opal Rounds Assortment.

For the most stepped-up card, stamp the floral images and leaves in Basic Beige for a no-line look; then, watercolor the images with ink and a Water Painter and die cut. Adhere the stamped, die-cut image to the top Crumb Cake Cardstock layer (embossed using the Forever Plaid 3D Embossing Folder). Splatter the card with watered-down white Craft Stampin’ ink refill and a Water Painter. Die cut the sentiment (stamped in VersaMark ink and heat embossed with white Wow! Embossing Powder). Once the ink splatter is dry, add a Baker’s Twine bow. Distress the edges of the top Crumb Cake Cardstock layer using scissors.

Please, Leave A Comment

Pamela Sadler Signature

Storybook Time

I just received the Storybook Friends and Designer Series Paper.  You don’t want to miss this one.  It is a fun one to play with.  There is a sheet with images you poke out and use.  I used the darling frame and then cut a cottage from the Designer Series Paper.  I had to do some trimming because of the scrolls.  You don’t need to punch them out if you don’t want to. It will cut intact.

Then I simply stamped the image below and did some coloring.  The ground isn’t Sahara Sand. Instead it is Gray Granite.  Sorry about that.

Spotlight on a Stamp

Color Combination:

    • Calypso Coral
    • Gray Granite
    • Granny Apple Green
    • Pumpkin Pie

Stamp Set:

Ink:  

  • None

Blends:

  • Sahara Sand
  • Granny Apple Green
  • Pumpkin Pie

Paper: Remember I always use Basic White as my base.

  • Basic White
  • Calypso Coral

Designer Series Paper:

  • Storybook Moments 2 1/2″ x 2″

Tools:

  • Cut and Emboss Machine

Accessories:

  • Trimmer
  • Multi-Purpose Glue


Quick Links

DBWS    http://www.stampinup.net/esuite/home/pinkrose/events

Store  https://www.stampinup.com?demoid=2139595

Free Catalog https://stampinpinkrose.com/catalog-re

Join my team https://www.stampinup.com/join?demoid=2139595

Questions http://pamela@stampinpinkrose.com

Pinterest https://www.pinterest.com/stampinpinkrose

Youtube https://www.youtube.com/channel/UCiKnvPZ8Le3aWHzHslRWw0g/videos?

Facebook  https://www.facebook.com/stampinpinkrose/

Instagram  https://www.instagram.com/stampin_pink_rose/?hl=en

Etsy https://www.etsy.com/shop/CardsTrulyfromthHear

Need a card: www.cardstrulyfromtheheart.com


Please, Leave A Comment

Pamela Sadler Signature

Gratitude Tree Weekly Project

Today I using a stamp set that is part of Sale-a-bration. It is called Pick a Flower and is free with a $60 order from any of Stampin’ Up! catalogs. I hope you enjoy the first Weekly Project of the new year.

Stamp:

  • Pick A Flower

Ink:

  • Early Espresso
  • Parakeet Party
  • Blackberry Bliss

Paper:

  • Basic White 5 1/2″ x 8 1/2″ 4 1/2″ x 3 1/4″ 1″ x 1″ 2 3/4″ x 2 3/4″
  • Balmy Blue 5 1/4″ x 4 ” 3″ x 2 3/4
  • Crumb Cake 5 1/2″ x 4 1/4″ 1″ x 2″

Tools:

  • Adventurous Skys dies (clouds)
  • Deckled Rectangle
  • Spotlight On Nature Dies

Basic Tools:

  • Trimmer -152392
  • Cut And Embossing Machine – 149653
  • Multipurpose Liquid Glue – 110755

Instructions:

  1. Fold Basic White CS at 4 1/4″.
  2. Adhere Crumb Cake CS to the front of the card.
  3. Run Balmy Blue through the Cut And Emboss Machine using the Deckled Rectangles.
  4. Adhere to the center of the card.
  5. Run the Basic White  CS through the Cut And Emboss Machine using the Deckled Rectangles.
  6. Adhere to the center of the card.
  7. Run Balmy Blue through the Cut And Emboss Machine using the Decaled Rectangles.
  8. Adhere to the center of the card.
  9. Stamp the leaves in Parakeet Party on Basic White CS.
  10. Stamp the flowers in Blackberry Bliss to the same basic White CS.
  11. Cut the stamped flowers and leaves you stamped with the Spotlight on Nature with the Cut and Emboss Machine.
  12. Run Basic white CS through the Cut And Emboss Machine using the Adventurous Sky. (x2 clouds).
  13. Stamp the Tree Trunk in Early Espresso on Basic White CS.
  14. Fussy cut the tree trunk out.
  15. Cut out some Crumb Cake with the smaller Deckled Rectangles.
  16. Using Early Espresso ink, stamp the word “Thanks” on Crumb Cake CS.
  17. Adhere the Crumb cake you just cut to the bottom left of the card.
  18. Adhere both clouds to the top of the middle card on the left side. (see photo)
  19. Adhere the Basic White that you stamped the leaves and flower on to the center-right of the card.
  20. Adhere to the trunk of the tree right underneath the leaves to make it look like a tree.

CS = Card Stock

DSP = Designer Series Paper

Please, Leave A Comment

Pamela Sadler Signature