It Is Time to Change the Look!

It is time to mix up your card style.   The size remains the same 4 1/4″ x 5 1/2″ (A2).  I have a video for you to see the different styles.  Then you decide which one you like.

Remember change may be hard, but it is good because it adds spark to your creation.

The heart card is cut 4 1/4″ x 10 7/8″.  It is scored at 6 3/4″ and 2 1/2″ at opposite ends.

The deer card is 5 1/2″ x 7″ and scored at 2 3/4″ only and fold.

The gate fold card (fall card) 5 1/2″ x  8 1/2″. Score at 2″. Panels 1 7/8″ x 5″.

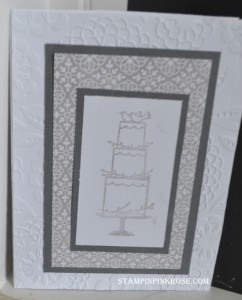
The wedding card 5 1/2″ x 6 2/3″. Scored at 2 1/2″.  One side only. Do the left side.

The latch card (Surprise) 5 1/2″ x 8 1/2″.  Score 2  1/2″ and 1 3/4″. Attach closure to the bottom or the right side.  DO NOT glue the latch totally on.

Any questions email me at cardstrulyftheart@hotmail.com


Please, Leave A Comment

Pamela Sadler Signature

Sneak Peak at June

I can’t believe June will be here tomorrow and this month can be a busy one for celebrations.  One celebration is Father’s Day on  June 21st or maybe not. I think of June traditionally as Wedding Month.  For me this is the case and hence a card is called for to celebrate the event.  Also, birthdays are always being celebrated.  So I am going to give you a sneak peak of some cards coming up. In the coming weeks you will see instructions how to make these cards.

Father’s Day

Father Day 1 resize

Wedding

Wedding 002 C

Birthday

Artisan Pictures I 002 C

Please, Leave A Comment

Pamela Sadler Signature

Do You Like the Bow or the Flower?

Birthday Bow

Today I am bringing you two cards and I want to hear from you on which card you prefer?  I know some of you are flower and others not so much.

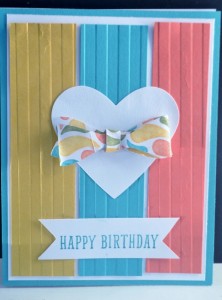
So I will start with the bow card made with the new Bow Punch. This was done with Bermuda Bay paper.  I just love coordinating Bermuda Bay with colors like Calypso Coral and Hello Honey which will still be available in the new catalog.

Directions:

  1.  Cut Whisper White cardstock 5 1/2″ x 8 1/2″ and fold at 4 1/4″ (base)
  2. Cut strips of Hello Honey, Bermuda Bay, and Calyspo  Coral 1 1/8″ each and embossed  with the textured Chevron embossing folder
  3. Cut a piece of Bermuda Bay 4 1/4″ x 5 1/2″ and adhere to the base
  4. Cut a piece of Whisper White cardstock 4″ x 5 1/4″ and adhere to the Bermuda Bay (part of base)
  5. Adhere each the strips of the  colors to the white cardstock in step #4
  6. With heart punch, punch out heart and place in the center of your card
  7. Using the bow punch make the bow (See Video Tips and Techniques)
  8. Place bow on card
  9. Using Itty Bitty Banner stamp the Happy Birthday on white cardstock. Then cut out the banner using Itty Bitty Framelit. Place on the card below the heart. See picture.  I chose a different way for the banner, but I thought this would be easier for some of you.

Note: The paper I used for the Bow is retired.  Choose a pattern paper from the Designer Series in the catalog and coordinate your colors. Remember each Designer Series paper has the colors listed on the package.

Built for Free Using: My Stampin Blog


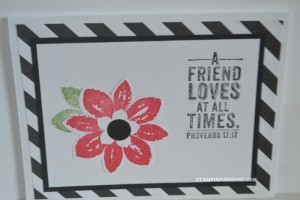
  The next card is all about a flower gracing the card.   I have it has a friendship card, but change the greeting and make it into a sympathy or whatever you like. DSC_0056 edit The striped paper is retired, but Stampin’ Up! has some great black and white paper called Back to Black. Directions:

  1.  Cut Whisper White cardstock 5 1/2″ x 8 1/2″ and fold at 4 1/4″ (base)
  2. Cut the black paper to 4″ x 5 1/4″  and adhere to the base
  3.  Cut black cardstock 3 1/2″ x 4 1/2″ and a white cardstock 3 1/4″ x 4 1/4″
  4.  White the cardstock in #3 stamp your greeting
  5.  Stamp the flower using Petal Potpourri.  I used Real Red, but the new Watermelon Wonder ink would look great on it.
  6.  Punch it out using Flower Medallion and use the  Petite Petal punch in white for the center. Then follow with 1/2″ circle in black of petal punch flower. Use a glue dot to give dimensions for the black circle.
  7.  For the leaf I stamped Petal Potpourri in Wild Wasabi and cut out 2 petals
  8.  Adhere the leaf on (see picture) and place flower over it.
  9.  Assemble card the with the solid black cardstock on over the stripe and the 3 1/4″ white cardstock on top.  This is the one that you placed the flower on with greeting.

Now let me know which card you like best.


Built for Free Using: My Stampin Blog


Please, Leave A Comment

Pamela Sadler Signature