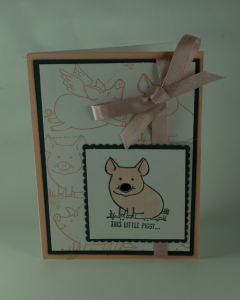
Card #1 Little Piggy
Stamp Set:
- This Little Piggy
Ink:
- Powder Pink
- Memento Black
Paper:
- Whisper White CS 5 ½” x 8 ½”. 3 ¾” x 5”, 3 3/4x 3 ¾”
- Powder Pink CS 4 ¼” x 5 ½”
- Black CS 4” x 5 ¼”, 4” x 4”
Embellishment:
- 3/8” Shimmer Ribbon Powder Pink
Accessories:
- Trimmer
- Big Shot
- Shaped Shapes Framelits
- Layering Squares
Instructions:
- Cut a piece of Whisper White the larger piece and fold at 4 ¼”
- Using the next smaller size of CS stamp in Powder Pink the pigs using three of the images.
- Adhere the stamped images to the Black CS.
- Tie a Powder Pink Ribbon around both sheets (stamped image & black CS)
- Adhere stamped images, with black to the card base.
- With the smaller black, CS cut using the Layering Squares Framelits scallop piece.
- With the smaller Whisper White CS cut out using the Stitched Shapes Framelits.
- Stamp in Memento Black ink on the white piece the pig’s image.
- Assemble the smaller CS pieces together and adhere to the card.
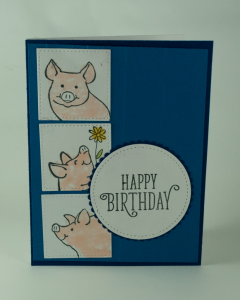
Card #2 Birthday Wishes from the Three Little Pigs
Stamp Set:
- This Little Piggy
- Happy Birthday Gorgeous (words)
Ink:
- Memento Black Ink
Blends:
- Powder Pink Light
- Daffodil Delight Light
Paper:
- Whisper White (I use as a base) 5 ½” x 8 ½” fold at 4 ¼”, 4” x 5”
- Pacific Point 4” x 5 ¼”
- Night of Navy 4 ¼” x 5 ½”, 4” x 4”
Accessories:
- Trimmer
- Big Shot
- Stitched Shapes Framelits Dies
- Layering Circles Framelits
- Pinewood Planks Embossing Folder
Instructions:
- Cut a piece of Whisper White the larger piece and fold at 4 ¼”
- Run the Pacific Point through the Pinewood Planks Embossing Folder
- Adhere to the Pacific Point CS to the card base.
- Using the smaller Stitched Shapes squares with the Whisper White CS cut out using the Big Shot.
- Stamp the pig images on the small squares with the Memento Black Ink. Use three of the four images.
- Color with the Blends each pig and the one flower.
- Adhere the squares down the left side the card.
- Cut out using the Night of Navy smaller piece, the scalloped circle from Layering Circles.
- Cut out using the Stitched Shapes a circle.
- Stamp the words on the circle.
- Adhere the white circle to the Navy Blue scalloped piece.
- Adhere both of the circles on the card.
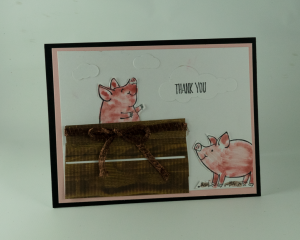
Stamp #3 Little Pig to Market
Stamp Set:
- This Little Piggy
- All Things Thanks (words)
Ink:
- Memento Black Ink
Blends:
- Powder Pink Light
Paper:
- Whisper White (I use as a base) 5 ½” x 8 ½”, 5” x 5”
- Powder Pink CS 4 ” x 5 1/4”
- Black CS 4 1/4” x 5 1/2”, 4” x 4”
Designer Series Paper:
- Wood Textures 6” x 6” one piece
Embellishment:
- ¼” Copper Ribbon
Accessories:
- Trimmer
- Big Shot
- Wood Crate Framelits Dies
- Up & Away Thinlits
Instructions:
- Cut a piece of Whisper White the larger piece and fold at 4 ¼” (Base)
- With the black CS adhere to the Base.
- With the Powder Pink CS adhere to the black CS.
- Stamp two pigs (see photo for image) and in Memento Black Ink.
- Color them with the Powdered Pink Blends and fussy cutout.
- Using the Wood Crate Framelits cut out with the Texture Wood DSP. Note you will not need all the pieces.
- Wrap and tie a ribbon around the crate.
- Cut out the clouds from the Up & Away Thinlits.
- Stamp with Memento Black Ink the greeting on one of the clouds.
- With the Whisper White CS assemble the images onto it. Place one of the pigs in the crate. See Photo.
- Adhere to the completed white CS to the card.
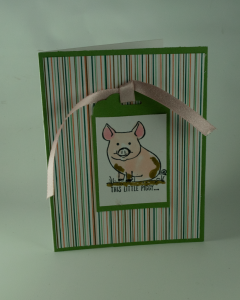
Card #4 Tag Time with the Piggy
Stamp Set:
- This Little Piggy
Ink:
- Memento Black Ink
Blends/Marker:
- Powder Pink Light & Dark
- Soft Suede
- Basic Black Marker
Paper:
- Whisper White 5 ½” x 8 ½” (base), 1 ¾” x 3”
- Pear Pizzazz 2” x 4”
Designer Series Paper:
- Tropical Escape 6” 6” 1 piece of stripped
Embellishment:
- 3/8” Shimmer Ribbon Powder Pink
Accessories:
- Trimmer
- Triple Banner Punch
Instructions:
- Cut a piece of Whisper White the larger piece and fold at 4 ¼” (Base)
- Adhere the Pear Pizzazz to the base.
- Adhere to the striped DSP to the Pear Pizzazz.
- Using the Triple Banner Punch, punch out the smaller Pear Pizzazz piece.
- With the smaller white CS stamp the pig with Memento Black Ink.
- Color the stamped image with the Blends.
- Tie the ribbon on the tag and adhere to the card.


